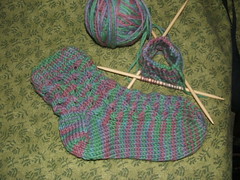
Honeycomb Hot Sox
A great project for someone new to socks and/or cabling. The relatively large gauge means these socks work up quickly- little risk of "second sock syndrome". The honeycomb cable is easy to memorize and makes for an elastic fabric.
Worked in KnitPicks “Color Your Own” (100% Merino Wool). 1 hank, 220 yds. I dyed mine in three sections using Kool-Aid for a self-striping pattern. This pattern is designed for a ladies’ medium foot- size 7-9. Add or subtract more rows from the foot to adjust length.
Gauge: 5 st/inch and 7 rows/inch worked in stockinette st
Needles: 1 set of 5 US#8 (5 mm) dpn
Cable needle
Honeycomb Stitch:
Rnd 1: C4B, C4F to end
Rnds 2-4: k
Rnd 5: C4F, C4B to end
Rnds 6-8: k
Cuff and leg:
CO 40 st. Divide equally on to 3 needles. Join, taking care not to twist.
Work in k1 p1 rib for 6 rows
Rnd 7: *k5, m1* rep from * * to end (48 st on needles)
Rnds 8-9: k
Begin honeycomb pattern. Work 2 repeats of pattern for 16 pattern rounds (25 total rounds worked for cuff)
At the end of round 25, the 16 st on the last needle worked will be worked back and forth in stockinette stitch for the heel flap. Just let the other st hang out on the other needles
Heel flap:
Row 1: sl1, p to end
Row 2: s 1, k to end
Rep rows 1 and 2 until 11 rows are worked (end on a purl row) and place marker at center of heel
Turn heel:
Working on heel flap stitches only
Row 1: sl 1, k9, k2tog, k1, turn
Row 2: sl1, p5, p2tog, p1
Row 3: s1, k to 1st st before gap created in Row 2, k2tog, turn
Row 4L s1, p to 1st st before gap created in Row 3, p2tog, turn
Rep Rows 3 and 4, ending with k2 tog and p2 tog respectively. 10 st remain on heel flap needle
Pick up stitches for gusset
Consider the needles to be numbered. The heel st are on needle one, and the instep (top of foot) st are on needles 2 and 3.
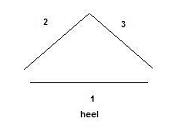
With needle one, pick up 9 st on edge of heel flap and knit across heel flap and these 9 st. On needles 2 and 3, work in C4B, C4F to end of needle 3. Take 4th dpn and pick up 9 st on other edge of heel flap and 5 st from needle one. Knit across these st. Center of heel denotes beginning of rounds to follow.
Needles 2 and 3 should each have 16 st on them, needles 1 and 4 should each have 14 st st on them, for a total of 60 st on all 4 needles.
Shape instep/form gusset
Continue working in the round on 4 needles.
Rnd 1:
Needle 1: k to last 3 st, k2tog, k1
Needles 2&3: k
Needle 4: k1, ssk, k to end
Rnd 2: k on all needles
Rnd 3: as Rnd 1
Rnd 4:
Needles 1&4:k
Needles 2&3: C4F, C4B to end
Rnd 5: as Rnd 1
Rnd 6: k on all needles
Rnd 7: as Rnd 1
Rnd 8:
Needles 1&4:k
Needles 2&3: C4B, C4F to end
Rnd 9: as Rnd 1
Rnd 10: k on all needles
Rnd 11: as Rnd 1
This completes the instep/gusset. 48 st total remain on needles
Foot:
Continue working on 4 needles on established pattern until foot is about 1.5” less than desired length. To continue in pattern, the next round after shaping is complete will be:
Needles 1&4:k
Needles 2&3: C4F, C4B to end
You will always k on needles 1&4, and continue honeycomb pattern on 2&3. If possible, try to end foot after the round in which needles 2&3 are knit in r1 of honeycomb pattern.
Toe (you’re almost there!!!)
Rnd 1: *k4, k2tog, k4, ssk* rep between * * to end (40 st total rem on needles)
Distribute st evenly among 4 needles (10 st/needle). End of rounds is still denoted at back of sock.
Rnd 2:
Needle 1: k to last 3 st, k2 tog, k1
Needle 2: k1, k2 tog, k to end
Needle 3: k to last 3 st, ssk, k1
Needle 4: k1, ssk, k to end
Rnd 3: k
Repeat this pattern until 20 st total rem on needles. Line up 10 st on top of foot with 10 st on bottom of foot and graft. Wash, block, and wear your sexy socks with pride!!!
Worked in KnitPicks “Color Your Own” (100% Merino Wool). 1 hank, 220 yds. I dyed mine in three sections using Kool-Aid for a self-striping pattern. This pattern is designed for a ladies’ medium foot- size 7-9. Add or subtract more rows from the foot to adjust length.
Gauge: 5 st/inch and 7 rows/inch worked in stockinette st
Needles: 1 set of 5 US#8 (5 mm) dpn
Cable needle
Honeycomb Stitch:
Rnd 1: C4B, C4F to end
Rnds 2-4: k
Rnd 5: C4F, C4B to end
Rnds 6-8: k
Cuff and leg:
CO 40 st. Divide equally on to 3 needles. Join, taking care not to twist.
Work in k1 p1 rib for 6 rows
Rnd 7: *k5, m1* rep from * * to end (48 st on needles)
Rnds 8-9: k
Begin honeycomb pattern. Work 2 repeats of pattern for 16 pattern rounds (25 total rounds worked for cuff)
At the end of round 25, the 16 st on the last needle worked will be worked back and forth in stockinette stitch for the heel flap. Just let the other st hang out on the other needles
Heel flap:
Row 1: sl1, p to end
Row 2: s 1, k to end
Rep rows 1 and 2 until 11 rows are worked (end on a purl row) and place marker at center of heel
Turn heel:
Working on heel flap stitches only
Row 1: sl 1, k9, k2tog, k1, turn
Row 2: sl1, p5, p2tog, p1
Row 3: s1, k to 1st st before gap created in Row 2, k2tog, turn
Row 4L s1, p to 1st st before gap created in Row 3, p2tog, turn
Rep Rows 3 and 4, ending with k2 tog and p2 tog respectively. 10 st remain on heel flap needle
Pick up stitches for gusset
Consider the needles to be numbered. The heel st are on needle one, and the instep (top of foot) st are on needles 2 and 3.
With needle one, pick up 9 st on edge of heel flap and knit across heel flap and these 9 st. On needles 2 and 3, work in C4B, C4F to end of needle 3. Take 4th dpn and pick up 9 st on other edge of heel flap and 5 st from needle one. Knit across these st. Center of heel denotes beginning of rounds to follow.
Needles 2 and 3 should each have 16 st on them, needles 1 and 4 should each have 14 st st on them, for a total of 60 st on all 4 needles.
Shape instep/form gusset
Continue working in the round on 4 needles.
Rnd 1:
Needle 1: k to last 3 st, k2tog, k1
Needles 2&3: k
Needle 4: k1, ssk, k to end
Rnd 2: k on all needles
Rnd 3: as Rnd 1
Rnd 4:
Needles 1&4:k
Needles 2&3: C4F, C4B to end
Rnd 5: as Rnd 1
Rnd 6: k on all needles
Rnd 7: as Rnd 1
Rnd 8:
Needles 1&4:k
Needles 2&3: C4B, C4F to end
Rnd 9: as Rnd 1
Rnd 10: k on all needles
Rnd 11: as Rnd 1
This completes the instep/gusset. 48 st total remain on needles
Foot:
Continue working on 4 needles on established pattern until foot is about 1.5” less than desired length. To continue in pattern, the next round after shaping is complete will be:
Needles 1&4:k
Needles 2&3: C4F, C4B to end
You will always k on needles 1&4, and continue honeycomb pattern on 2&3. If possible, try to end foot after the round in which needles 2&3 are knit in r1 of honeycomb pattern.
Toe (you’re almost there!!!)
Rnd 1: *k4, k2tog, k4, ssk* rep between * * to end (40 st total rem on needles)
Distribute st evenly among 4 needles (10 st/needle). End of rounds is still denoted at back of sock.
Rnd 2:
Needle 1: k to last 3 st, k2 tog, k1
Needle 2: k1, k2 tog, k to end
Needle 3: k to last 3 st, ssk, k1
Needle 4: k1, ssk, k to end
Rnd 3: k
Repeat this pattern until 20 st total rem on needles. Line up 10 st on top of foot with 10 st on bottom of foot and graft. Wash, block, and wear your sexy socks with pride!!!
posted by Elizabeth at 6:07 PM
2 comments
![]()