Monday, February 19, 2007

Noro Kureyon One-Ball Wavy Gravy Hat Pattern


Is that a long enough name for a pattern? Anyway, this hat uses a little less than one ball of Noro Kureyon. I wanted to come up with a hat pattern that would use that one odd ball I always have laying around, but have the hat be long enough to cover the ears (I'm not a big fan of beanies). Plus, the pattern stitch is very stretchy... although the finished diameter of the hat is 17", it stretches comfortably around my 22" noggin (I have a verry large head).


Dimensions: 7.5" from center of crown to base of scalloped brim. 17" diameter- but can accomodate a wide range of head sizes (see above).

Yarn: 1 ball Noro Kureyon (hat shown in color #159 )

Needles: 1 16" or 20" circular in 5 mm (US#8). Set of 5 dpn in same size.

Gauge: 5 st/inch and 8 rows/inch in stockinette stitch.

Instructions:

Using long-tail CO, loosely cast on 72 sts

Join, taking care not to twist

Rnds 1&4: purl

Rnd 2: knit

Rnd 3: *(k2tog) two times, (yo,k1) four times, (k2tog) two times* rep from * to * to end of rnd

Rnds 5&6: knit

Rnd 7: as Rnd 3

Rnd 8: purl

Repeat rnds 5-8 a total of 9 times.

Knit two rnds

Decrease for crown:

Rnd 1: *k7, k2tog* rep from *to* to end of round (64 sts rem)

Rnd 2: knit

Rnd 3: *k6, k2tog* rep from *to* to end of round (56 sts rem)

Rnd 4: knit

Continue as established, decreasing 8 sts every other rnd until 8 sts rem. Draw yarn through the remaining stitches and fasten off. Block lightly.

Labels: , ,

Monday, January 22, 2007

A New Year, Some New Colorful Goodies

I seem to be recovered enough from the madness of the holidaze to find time to blog again. I have to say, I have been doing a lot of knitting, but have just not had the motivation to write about it. Mostly this comes from the fact that our Internet connection is verrry slow, and it takes a long time to load pictures. I'm not a fan of very wordy blogs with few photos, so I like to make sure I am avoiding that in this one...
Anyway, we experienced a little bit of disappointment this Christmas- we had plans to travel to Boston to stay with my new in-laws. Unfortunately, the weather in Kodiak did not permit us to fly out on the scheduled date, and with all of the travel woes facing the Lower 48 at that time, the best the airline could have donw was get us into Boston on Christmas Day. We decided to reschedule our trip, got a full refund (!) and are going to head there for St. Paddy's Day. I told the husband that my goal is to puke Guinness all over him, then get in a fight with a barstool. Because I'm classy like that.

I did get to go to Portland, OR for a week shortly after the new year to see my family. Of course, as with any good trip, I stopped at some fiber shops. First, I went to Knit Knot, an adorable lil' shop in the swanky Pearl District. I like this place, it's small, but there is everything you need. The woman who owns the shop (also an Elizabeth) is extremely friendly and helpful. Here is my haul:

Some Elsebeth Lavold Silky Wool, Noro Aurora (perfect for AK- actually knits up looking very Aurora-ish), some rainbow mohair (on sale!), some cobwebby NZ wool,
and some Regia Bamboo. Nice.

The best part is, I could not have gotten all of this without a very dear friend. You see, I went downtown to meet my friend Nate for lunch (oh my, Lebanese food- we don't get that in these parts). I was a bit early, so I stopped into Knit Knot on the way and got the mohair and Aurora. When Nate and I met for lunch, he handed me a brown package. "There's a funny story behind this," he said. Curiously, I opened the package, and inside was an envelope with Congratulations written in Arabic (his major at Portland State University) containing a gift certificate to... guess where... Knit Knot! Seems he remembered that I really liked that store last time I came to town, which I mentioned with great excitement when I came to eat at his work just a few doors down on my visit several months before. This was a belated wedding gift, and exceedingly thoughtful. Turns out, he came in the shop about 10 min after I left, and upon speaking with the propreitor about the fact that this was for a friend from Alaska, she realized that same girl had just come in. Smart man though, he made the purchase anyway, knowing that I always am in need of more yarn...

OK, so much for not being too wordy. Next stop, my mom and I went to Northwest Wools, and she bough me the following for a late Christmas present: 8 oz of handpainted Corriedale Roving, some merino top, a little camel down, recycled sari silk, a ball of Silk Garden, and, one of those cute lil' sweater keyrings from Lantern Moon (I LOVE that company!). She insisted, much to my amusement, that I needed one. Love that woman.
In other news, I am knitting a hat for my stepdaughter. She is in a bit of a hippie-dippie phase, which I also went into at that age (almost 15). I decided to make here a hippie-dippie hat using Cascade Pastaza. She is really into llamas, so I thought she would appreciate a hat made of 50/50 llama/wool. The pattern is the "Scrunchie Hat" from One-Skein Wonders (not to be confused with the also awesome book entitled One Skein). This is a great book- especially for us handspinners who have orphan skeins of yarn on our hands. A must buy, and you get a lot of bang for your $18.95! I'm knitting the hat using Us#8 Destiny needles from Lantern Moon (a gift from my boss at the LYS- ebony... OMFG)... also pictured is a sweet lil' silk bag, also from Lantern Moon from the same person, for carrying a small knitting project. She knows that I love to knit hats, and gave me these exceedingly thoughtful gifts for Christmas- thank you!


uggh.. pardon the el crappo pic


Am also knitting up the Purple Pewter yarn into a little lace mini-shawl, using this pattern. I like to pattern... very easy to get into the rhythm of it, and looks pretty without having to squint at a chart all the time! Of course, it looks all sad and scrunched-up now, but hopefully soon it will be ready for blocking so it's true beauty can come through. The handspun yarn has a painterly quality that I am enjoying very much in the knitted piece, which also has nice hand and drape when knit on us#9 needles.


OK, there is way much more I have been doing, but I am going to give my hands a bit of a break! I will work hard not to be such a hypocrite and have more photos/less text in the next post...

Labels: , ,

Monday, November 13, 2006

Honeycomb Hot Sox

A great project for someone new to socks and/or cabling. The relatively large gauge means these socks work up quickly- little risk of "second sock syndrome". The honeycomb cable is easy to memorize and makes for an elastic fabric.

honeycomb sock


Worked in KnitPicks “Color Your Own” (100% Merino Wool). 1 hank, 220 yds. I dyed mine in three sections using Kool-Aid for a self-striping pattern. This pattern is designed for a ladies’ medium foot- size 7-9. Add or subtract more rows from the foot to adjust length.

Gauge: 5 st/inch and 7 rows/inch worked in stockinette st

Needles: 1 set of 5 US#8 (5 mm) dpn
Cable needle

Honeycomb Stitch:

Rnd 1: C4B, C4F to end
Rnds 2-4: k
Rnd 5: C4F, C4B to end
Rnds 6-8: k


Cuff and leg:

CO 40 st. Divide equally on to 3 needles. Join, taking care not to twist.

Work in k1 p1 rib for 6 rows
Rnd 7: *k5, m1* rep from * * to end (48 st on needles)
Rnds 8-9: k

Begin honeycomb pattern. Work 2 repeats of pattern for 16 pattern rounds (25 total rounds worked for cuff)

At the end of round 25, the 16 st on the last needle worked will be worked back and forth in stockinette stitch for the heel flap. Just let the other st hang out on the other needles

Heel flap:

Row 1: sl1, p to end
Row 2: s 1, k to end

Rep rows 1 and 2 until 11 rows are worked (end on a purl row) and place marker at center of heel


Turn heel:

Working on heel flap stitches only

Row 1: sl 1, k9, k2tog, k1, turn
Row 2: sl1, p5, p2tog, p1
Row 3: s1, k to 1st st before gap created in Row 2, k2tog, turn
Row 4L s1, p to 1st st before gap created in Row 3, p2tog, turn

Rep Rows 3 and 4, ending with k2 tog and p2 tog respectively. 10 st remain on heel flap needle


Pick up stitches for gusset

Consider the needles to be numbered. The heel st are on needle one, and the instep (top of foot) st are on needles 2 and 3.

honeycomb

With needle one, pick up 9 st on edge of heel flap and knit across heel flap and these 9 st. On needles 2 and 3, work in C4B, C4F to end of needle 3. Take 4th dpn and pick up 9 st on other edge of heel flap and 5 st from needle one. Knit across these st. Center of heel denotes beginning of rounds to follow.

Needles 2 and 3 should each have 16 st on them, needles 1 and 4 should each have 14 st st on them, for a total of 60 st on all 4 needles.


Shape instep/form gusset

Continue working in the round on 4 needles.

Rnd 1:
Needle 1: k to last 3 st, k2tog, k1
Needles 2&3: k
Needle 4: k1, ssk, k to end

Rnd 2: k on all needles
Rnd 3: as Rnd 1
Rnd 4:
Needles 1&4:k
Needles 2&3: C4F, C4B to end
Rnd 5: as Rnd 1
Rnd 6: k on all needles
Rnd 7: as Rnd 1
Rnd 8:
Needles 1&4:k
Needles 2&3: C4B, C4F to end
Rnd 9: as Rnd 1
Rnd 10: k on all needles
Rnd 11: as Rnd 1

This completes the instep/gusset. 48 st total remain on needles

Foot:

Continue working on 4 needles on established pattern until foot is about 1.5” less than desired length. To continue in pattern, the next round after shaping is complete will be:
Needles 1&4:k
Needles 2&3: C4F, C4B to end

You will always k on needles 1&4, and continue honeycomb pattern on 2&3. If possible, try to end foot after the round in which needles 2&3 are knit in r1 of honeycomb pattern.

Toe (you’re almost there!!!)

Rnd 1: *k4, k2tog, k4, ssk* rep between * * to end (40 st total rem on needles)

Distribute st evenly among 4 needles (10 st/needle). End of rounds is still denoted at back of sock.

Rnd 2:
Needle 1: k to last 3 st, k2 tog, k1
Needle 2: k1, k2 tog, k to end
Needle 3: k to last 3 st, ssk, k1
Needle 4: k1, ssk, k to end
Rnd 3: k

Repeat this pattern until 20 st total rem on needles. Line up 10 st on top of foot with 10 st on bottom of foot and graft. Wash, block, and wear your sexy socks with pride!!!

Naiad Scarf

naiad


This pattern is a great way to use up odds and ends of yarn. You will need approximately 250 yds of worsted weight yarn for this project. Thinner yarns can be doubled and the nature of this pattern makes it such that small differences is gauge do not have an adverse effect on the finished product. I used yarns chosen to compliment a ball of Noro Kureyon #150, 1 ball of which was used as the primary yarn in this project.

The entire scarf is worked lengthwise in Old Shale Stitch as follows:

Row 1 (rs): knit
Row 2: purl
Row 3: *(k2tog) three times, (yo, k1) six times, (k2tog) three times* repeat from * to * to end of row
Row 4: knit

To make this scarf, you will need a 60” circular in Size US # 11 to accommodate all of the stitches. After each row, break the yarn, leaving an 8” tail for fringe (optional)

How to do it:

Cast on 180 st loosely

Work in Old Shale stitch, repeating four rows of pattern 6 times. I broke the yarn at the end of each row, leaving 8 inches for fringe. Bind off loosely. Tie off fringe to prevent unraveling and trim evenly. That’s it!

Beyond the Basics hat

Beyond the basics: an introduction to lace, cable, and colorwork

hat4class


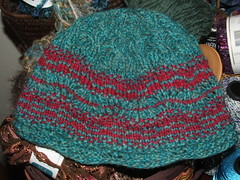
The purpose of this pattern is to introduce to the concept of circular knitting while using basic lace, colorwork, and cabling techniques. This hat will be completed in phases, with only one technique learned per phase. Although the appearance of the hat may seem complicated, this pattern emphasizes how the very simplest combination of stitches can make it look as though you did more work than you really did!

Pattern notes:
Each round gives a set of instructions. Repeat this set of instructions until you get to the end of the round.

Abbreviations:
mc : Main Color, cc: Contrast Color (pay attention to when this is noted in the pattern!)
k: knit, p: purl
yo: Yarn over
k2tog: knit two together, p2tog: purl two together
rnd: round

C6F: 6 stitch forward cable (more on this later)
C4F: 4 stitch forward cable (ditto)

Gauge: 5.5 st/inch and 8 rows/inch over stockinette stitch
Needles: US #6 (4mm) 16” circular and same size dpn (or size needed to get gauge!), cable needle
Yarn: 2 skeins Cascade 220 (light worsted weight) in different colors.
This should be enough to make 2 hats, provided you swap the main and contrast colors for the second hat

Phase 1: Casting on, joining into the round, and a VERY simple lace pattern

Cast on 96 stitches using long-tail method.

Purl one row.

Why did we purl one row before joining into a round? Because this helps eliminate the chance that the stitches will be twisted when they are joined into a circle. OK, take a deep breath- now we will join into a round. At this point, place a marker so that you know when the round begins and ends. We will start the hat with a simple lace stitch referred to as “Old Shale” or “Feather and Fan”.
Round 2: knit
Round 3: (k2tog) twice, (yo, k1) four times, (k2tog) twice to end of round.
Rnd 4: purl
Rnds 5 & 6: knit
Rnd 7: as Rnd 3
Rnd 8: purl
Rnd 9: k1, p1 to end

Phase 2: playing with color
Here we will not only see how cool it looks when you combine colors with knit and purl stitches, but also get a feel for stranded colorwork (often referred to as “Fair Isle”) using a very simple pattern.

Notes for stranding colors:
Do not pull the strands too tight when changing colors, but do not leave them too loose either! Just use the tiniest bit of tension when changing to the next color. The same goes for when carrying the yarn vertically up the work.

Choose which yarn to keep on top and on bottom. For example, I always bring the contrast color up from under the main color when working with two strands. This makes the work look neater and you avoid a tangled mess.

Rnd 10: with contrast color (cc), p1, k1 to end
Rnd 11: k with mc
Rnd 12: k with cc
Rnds 13-15: follow three rounds of color chart
(Say what? What is a color chart and why should I follow it ?!? A color chart is used in most 2-strand color patterns to show what to do while not having to use a bunch of words to do it. Our color chart shows a repeat of 6 stitches and 3 rows. When working in the round, charts are read FROM RIGHT TO LEFT and BOTTOM TO TOP.
Here is the chart for our hat:
beyondchart

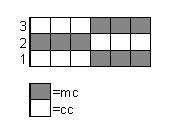
(Each square in the chart represents one stitch. For example, in the first row, you knit 3 stitches with the mc, then 3 with the cc until the end.)
Rnds 16 & 17: k with cc
Rnd 18: k1, p1 with mc
Rnd 19: p1, k1 with cc

Phase 3: you’ve been here before- more lace and colorwork
The next 8 rounds are very much the same as those we started with (Old Shale stitch)

Rnds 20 & 21: knit with mc
Rnd 22: as Rnd 3
Rnd 23: knit with cc
Repeat these four rnds, all with mc (rnds 24-27)

Rnd 28: k1, p1 with cc
Rnd 29: knit with cc
Rnds 30 & 31: work first two rows of color chart
Rnds 32 &33: knit with cc
Rnd 34: k1, p1 with mc
Rnd 35: p1, k1 with cc (cut cc at this point, leaving a 6” tail for weaving in later. All rnds from this point are worked with mc.)
Rnds 36-39: as rnds 24-27)


Phase 4: A little bit of cabling, and the light at the end of the tunnel

OK, we are nearing the end. Really. This is the part where we begin shaping the top of the hat by decreasing stitches. This is also the point where we will need to use double-pointed needles since their will be less stitches (the pattern will tell you when to make the transition). It is possible to make hats just by knitting one big tube and drawing it together at the top. However, it looks much more elegant to shape it a bit (and it’s pretty easy, so why not?)

Before actually decreasing stitches, will start out by learning a very basic cable. Because cables draw in the fabric somewhat, this is also the first step in the decreasing process. OK. Take a deep breath- we need to lay the groundwork for the cables first so that we have some stitches to work with. To do this, on the next six rounds, you will:

K6, p2 (rnds 40-45)

Note: On Rnd 45, work sts onto three dpn’s such that there are 32 st on each needle. At this point, you will not be able to keep the marker on the needles to denote the beginning of the round. Simply thread a piece of yarn through the knitting at this point so that you can keep your place.
On working with dpn’s: On the first stitch on each needle, pull the yarn tighter than usual to avoid getting ladders up your knitting.

Rnd 46: C6F, p2
(OK, this is the first cable round and C6F means 6-stitch forward cable. To do this, you will slip 3 stitches to the cable needle and hold them in the front of the work. Then, you knit the next three stitches off of the primary needle. Then, knit the stitches off the cable needle. See how the column of stitches got twisted? Congrats! You made a cable ;-) Then, purl the next two stitches and repeat the whole shebang to the end of the round.)

Rnd 47: k6, p2
Rnd 48: k2, k2tog, k2, p2 (84 st rem)
Rnd 49: k5, p2
Rnd 50: k1, k2tog, k2, p2 (72 st rem)
Rnd 51: k4, p2
Rnd 52: C4F, p2
(A 4-stitch forward cable is just like a 6-stitch- just worked over fewer sts! To do this, you will slip 2 stitches to the cable needle and hold them in the front of the work. Then, you knit the next two stitches off of the primary needle. Then, knit the stitches off the cable needle.)

Rnd 53: k4, p2tog (60 st rem)
Rnd 54: knit
Rnd 55: k4, p2tog (50 st rem)
Rnd 56: knit
Rnd 57: k3, p2tog (40 st rem)
Rnd 58: knit
Rnd 59: k2, p2tog (30 st rem)
Rnd 60: knit
Rnd 61: k1, p2tog (20 st rem)
Rnd 62: knit
Rnd 63: k2tog (10 st rem)
Draw yarn though remaining st and tie off. Weave in ends and block. You’re done!!!!